How Can We Help?
Web Streaming Setup Guide

| Project Name: | PMI SOC Web Streaming |
| Created by: | Chuck Wong |
| Project Manager: | Hans Ayala & Mitchell Fong |
| Project Sponsor: | Gregory Zelfond |
| Portfolio: | Technology |
| Date: | April 30, 2014 |
| Fiscal Year: | 2013 – 2014 |
TABLE OF CONTENTS
1. Project Team 4
1.1. Project Team 4
1.2. Project Setup Timing 4
2. Equipment Setup For Single Room (Keynote) Event 5
2.1. Where To Setup Equipment In Main Keynote Room 5
2.2. Equipment List 6
2.3. Equipment Positioning 7
2.4. Team Seating 8
2.5. Setting Up Equipment 8
2.6. Setup, Test & Maintain Audio Mics 9
2.7. Host A WebEx Meeting – By Host PC 11
2.8. Log Into WebEx Meeting – By Web Chat Monitor PC 17
2.9. WebEx Meeting Chat Introductions 20
2.10. Setup Lapel Mic Transmitter On Speaker 22
2.11. Event With Only 1 Speaker & 1 Presentation 23
2.12. Event With Multiple Speakers & Presentations 25
2.13. Event Wrap-Up 27
3. Equipment Setup For Two Rooms (Keynote & A Breakout Room) 28
3.1. Setting Up Rooms 28
3.2. WebEx Meeting Chat Introductions 29
3.3. Switching Between Rooms 31
EXECUTIVE SUMMARY
The 2013-14 Web Streaming team identified the need and importance of having a step-by-step setup guide after reviewing their Lessons Learned on the November 23, 2013 Professional Development Day (PDD) web streaming project.
This guide will act as a check list to follow in order to successfully deliver a professional web streaming broadcast. It is broken down into the following sections:
- Initial equipment setup
- Procedures for single-room streaming
- Procedures for two-room streaming
Wherever there is a or O checkbox, you must complete the action in the order in which it is written.
The current focus is instructions for setting up “At the Event”. Instructions for the other two areas will be added to this guide at a later date.
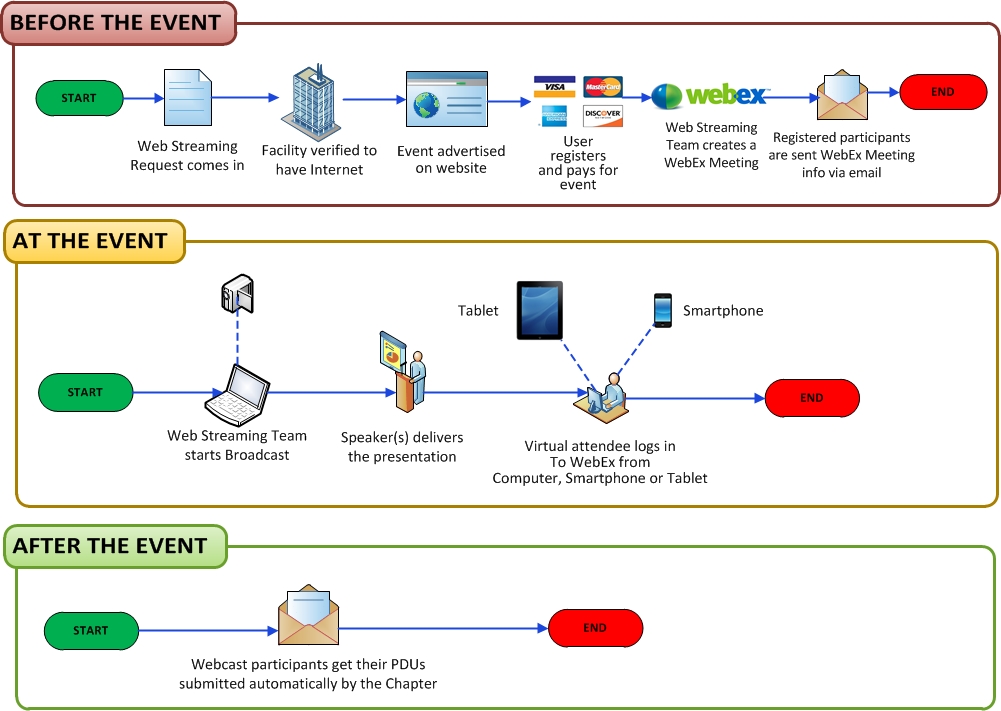
* Image courtesy of Greg Zelfond’s presentation at Ottawa R3 – “How To Use Web Streaming to increase Event Attendance”, May 31, 2014.
Project Team
Project Team
- Greg Zelfond Project Sponsor
- Hans Ayala Project Manager
- Mitchell Fong Project Manager
- Chuck Wong Web Streaming User Guide Lead
- Adriana Nedelcu Team member
- Cosmin Alexei Team member
- Ha Nguyen Team member
- Nancy Chen Team member
- Olga Brouckova Team member
Project Setup Timing
WARNING: Setup 120 – 150 minutes before the event
Do not underestimate the time required to properly setup and test the equipment!
Hardware Setup Diagram
* Image courtesy of Greg Zelfond’s presentation at Ottawa R3 – “How To Use Web Streaming to increase Event Attendance”, May 31, 2014.
Equipment Setup For Single Room (Keynote) Event
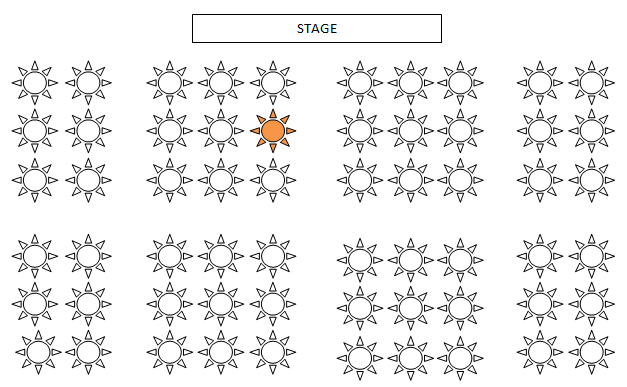
Where To Setup Equipment In Main Keynote Room
- Ideally you want to setup the equipment in the middle of the room
- Not at the back; the speaker could be too far away / zoom not effective / too many attendees in view
- Not at the front; the speaker could be too close / speaker could be walking in & out of view
- The camera will be on the tripod; therefore, the audience’s heads will not be captured. See page 4
Equipment List
Unpack the equipment required for single room streaming.
- HP Pavilion (G6-2235CA) laptop………….(Host PC – make sure MS Office is installed on laptop)
- Power cord
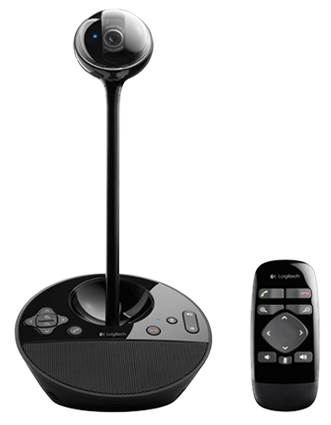
- Logitech BCC950 conference camera
- Camera
- Stand
- Base station
- Power cord
- USB cable
- Audio 2000 Equipment
- Base station
- Lapel mic transmitter 01
- Lapel mic transmitter 02
- Power cable
- 2 XLR/ 35mm cable
- Extension cord – 12 ft
- Power bar* – 6+ slots
- Batteries 9V for lapel mic transmitter………….(use NEW batteries)
- AC-201 stereo headset with mic
- Tabletop tripod*
- Camera base attachment
- USB male to female extension cable (if required)
- Laptop # 2………….(Web Chat Monitor PC)
- Power cord
- Wireless mouse (if available)
* Chuck donated 2 new power bars and 2 tabletop tripods with a custom fabricated camera base attachment to PMI SOC’s web streaming equipment.
Equipment Positioning
- Setup equipment according to pictures below
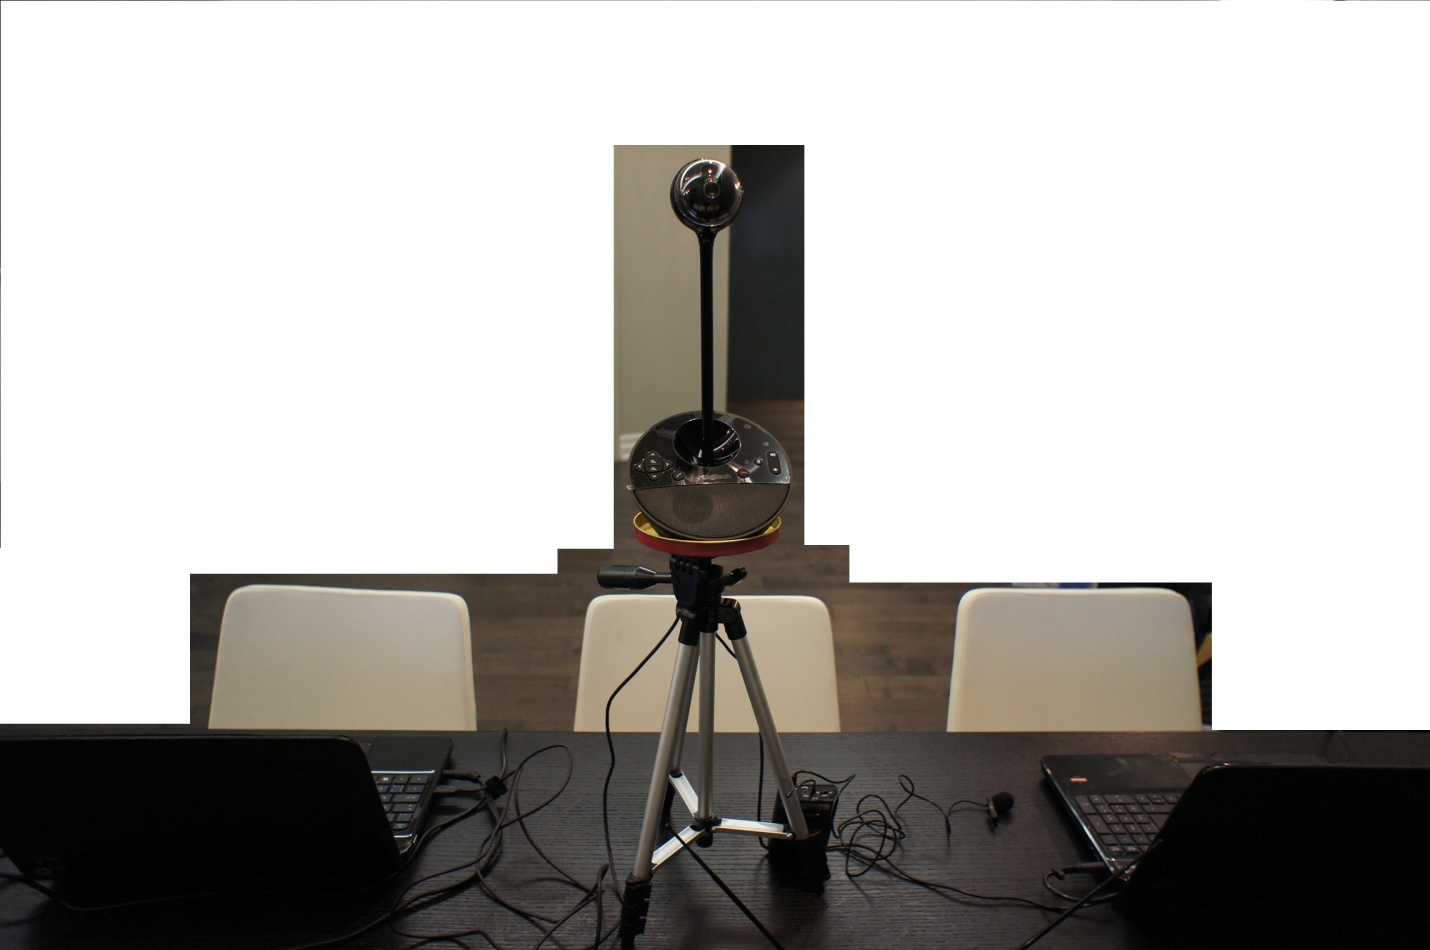
View from the Speaker’s perspective
Camera on base
Web chat monitor PC
Host PC
Tabletop tripod & camera base attachment
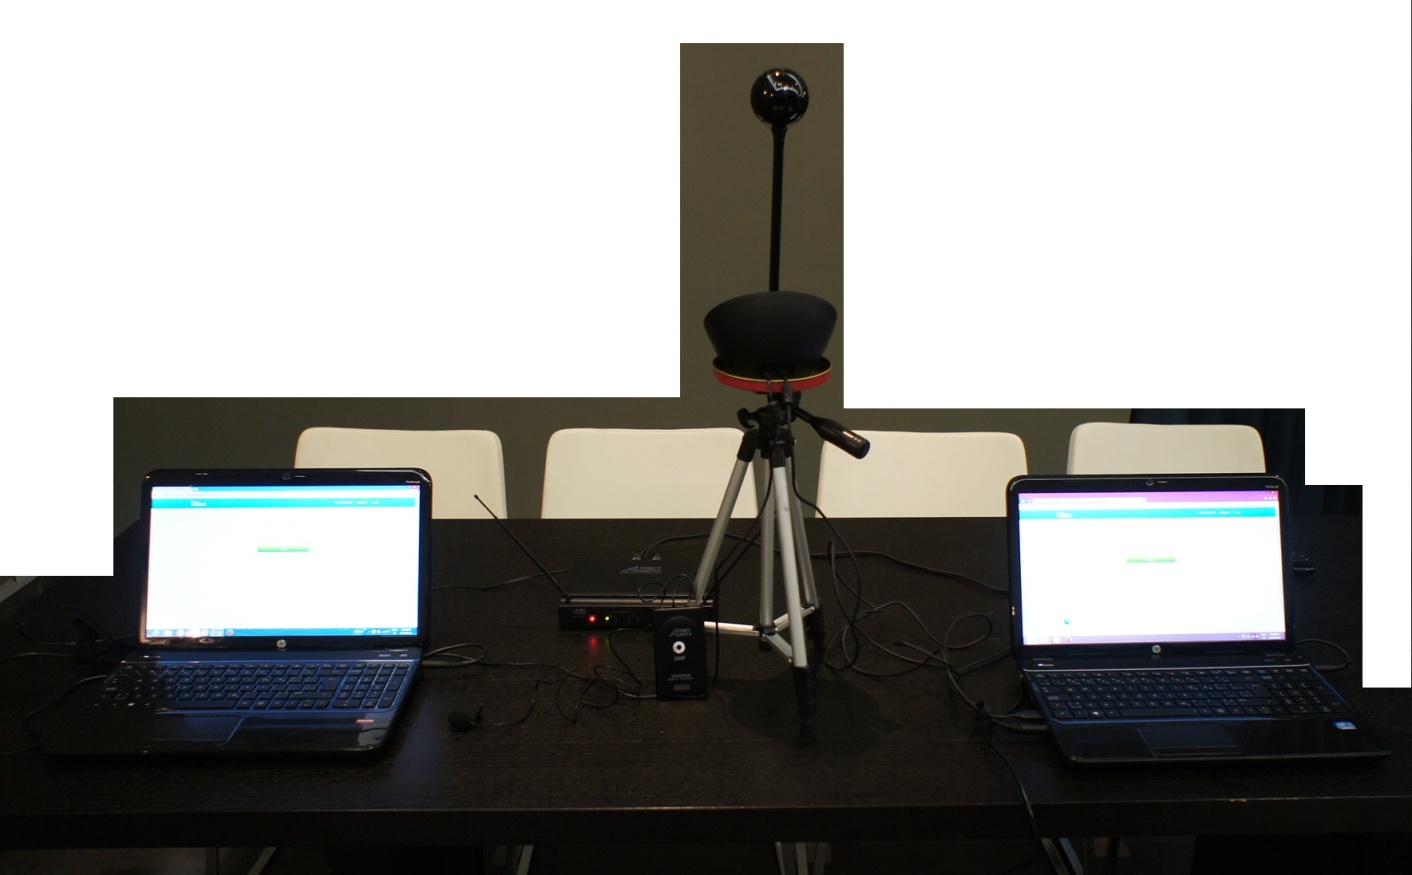
View from the Team’s perspective
Tabletop tripod & camera base attachment
Web chat monitor PC
Audio receiver
Host PC
Camera on base
Team Seating
- Left seat — Web chat monitor PC operator
- Middle seat — Camera operator
- Right seat — Host PC operator
Setting Up Equipment
- Plug in extension cord to wall outlet (be sure plug is securely in outlet, use duct tape if required)
- Plug power bar (minimum of 6 outlets) into extension cord
- To safeguard against tripping over the extension cord, tape it down with duct tape
- Plug PCs power cord in
- Plug audio receiver power cord in (see Page 9)
- Plug audio XLRM cable into audio receiver and other end to host PC mic slot (see Page 9)
- Plug camera power cord in
- Plug camera USB cable into host PC USB slot
- Put new battery in lapel mic transmitter (see Page 10)
- Turn on power bar
- Turn PC’s power on
- Turn camera power on
- Turn audio receiver power on (see Page 9)
- Adjust Level 1 volume to 75% (for mic 1), same for Level 2 if using mic 2
- Turn on BOTH lapel mic transmitters (see Page 10)
- Speak into lapel mic & look for green light to flash on audio receiver (in working order)
Setup, Test & Maintain Audio Mics
AUDIO RECEIVER
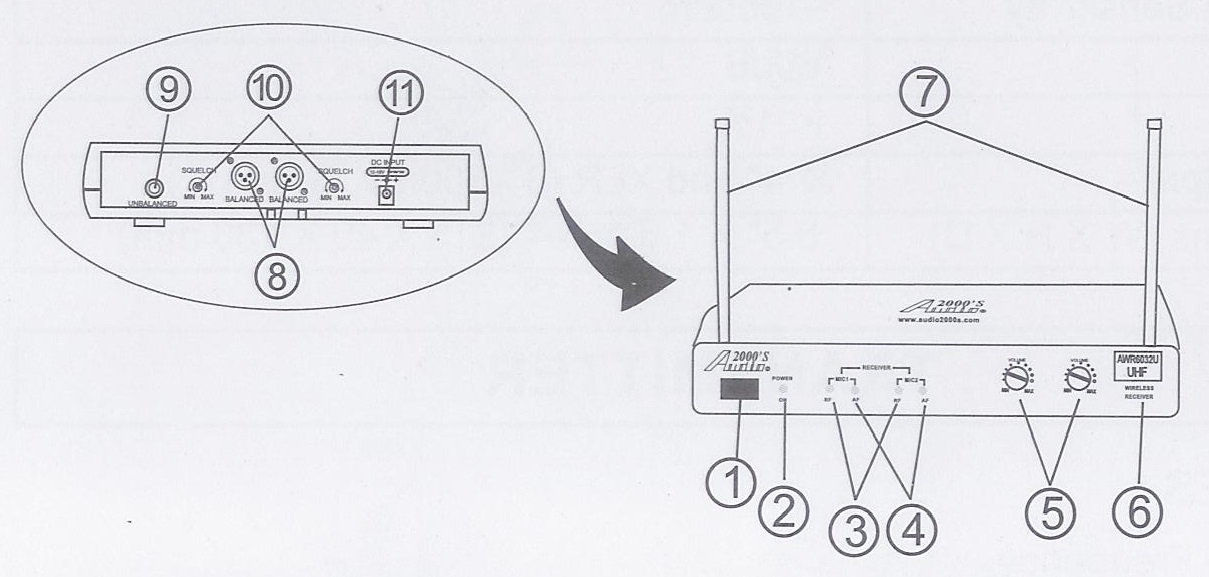
- Power On/Off switch
- Power On LED Indicator
- RF signal indicators
- AF signal indicators
- Audio level adjustment knobs
- Model
- Antennas
- Balanced audio outputs (XLRM jacks)
- Unbalanced audio outputs (1/4″ jack)
- Squelch control knobs
- Plug audio receiver power cord into power bar
- Plug audio XLRM cable into audio receiver, and other end to host PC mic slot
- After the power bar is turned on
- Turn audio receiver power on
- Adjust Level 1 volume to 75% (for mic 1), same for Level 2 if using mic 2
LAPEL MIC TRANSMITTER
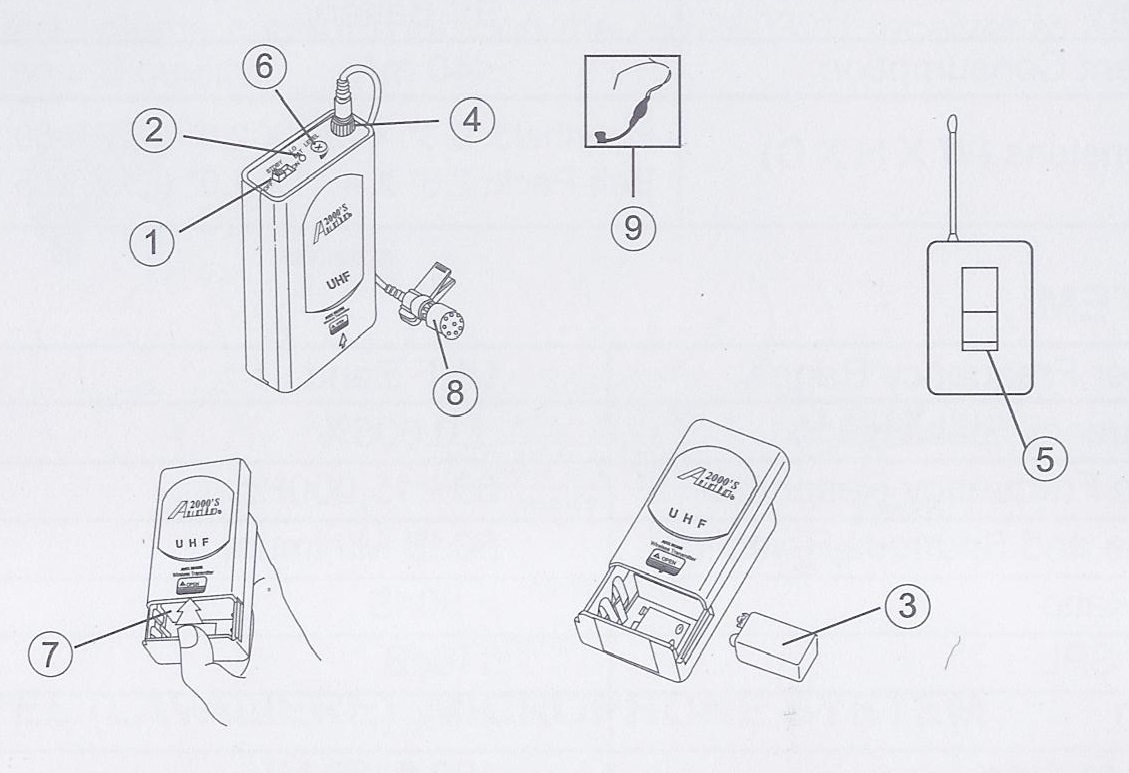
- Power and audio mute switch
- Low batter LED indicator
- 9V battery
- Audio input jack
- Belt-pack clip
- Audio level adjustment knob
- Put in NEW 9V battery
- Turn on lapel mic transmitter
- Speak into lapel mic & look for green light to flash on audio receiver (in working order)
- After confirmation audio is working, KEEP lapel mic transmitter on
- Adjust the audio receiver’s audio level adjustment knobs to ZERO
- 1 lapel mic transmitter should be affixed on speaker’s podium, the other lapel mic transmitter goes on the speaker
Always keep audio receiver to ZERO until the speaker goes on
Host A WebEx Meeting – By Host PC
- Go to desktop
- Start Chrome (or Internet Explorer)
- Type this address into address bar to access WebEx to host a Meeting: https://www.webex.com/login/host-a-meeting
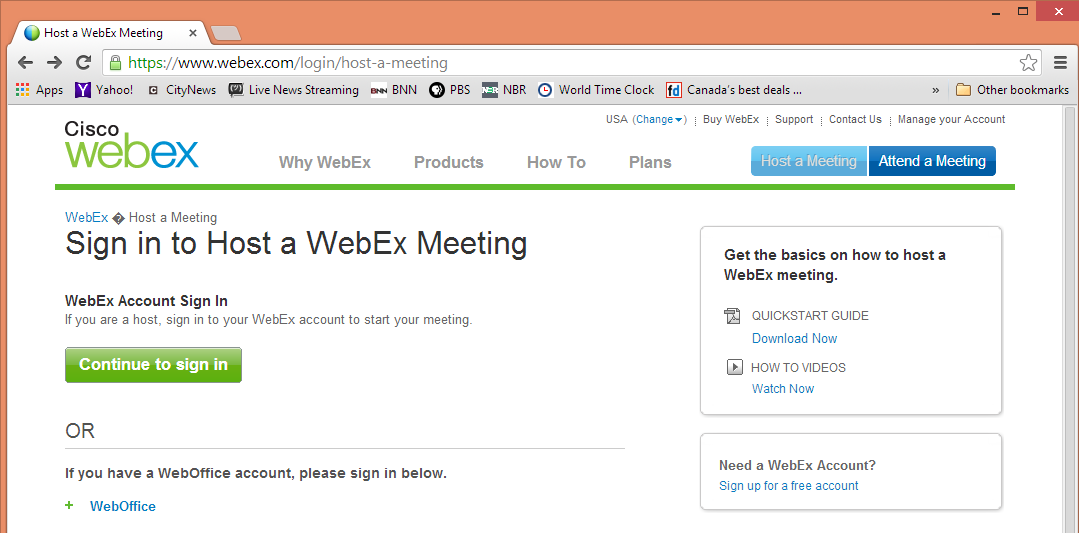
- Click “Continue to sign in” button
- Sign in to WebEx with email address: anthony@soc.pmi.on.ca
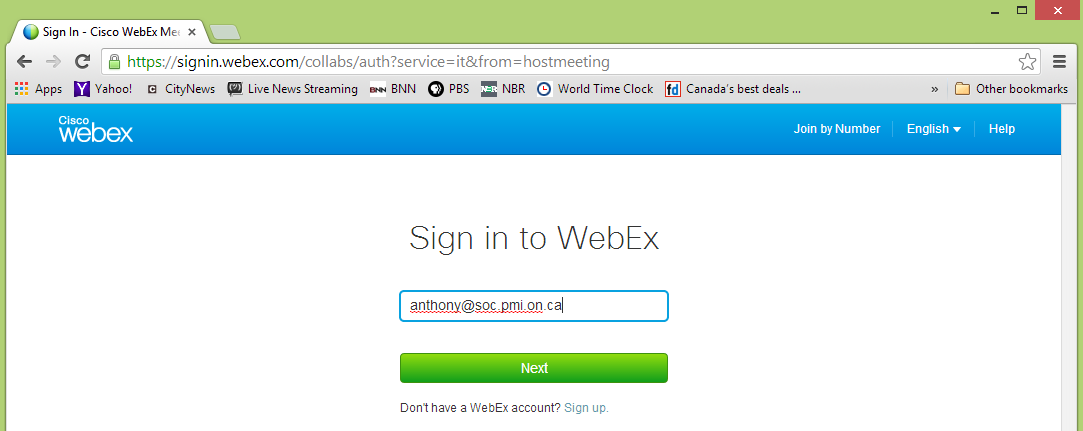
- Click “Next” button
- Enter password: xxxxxxxxxx……..(Project manager will distribute password to team)
- Click “Sign In” button
*** PMI SOC’s current plan is “Premium 100” – 1 host & up to 100 people per meeting
- Click the scheduled meeting

- Click “Start” button
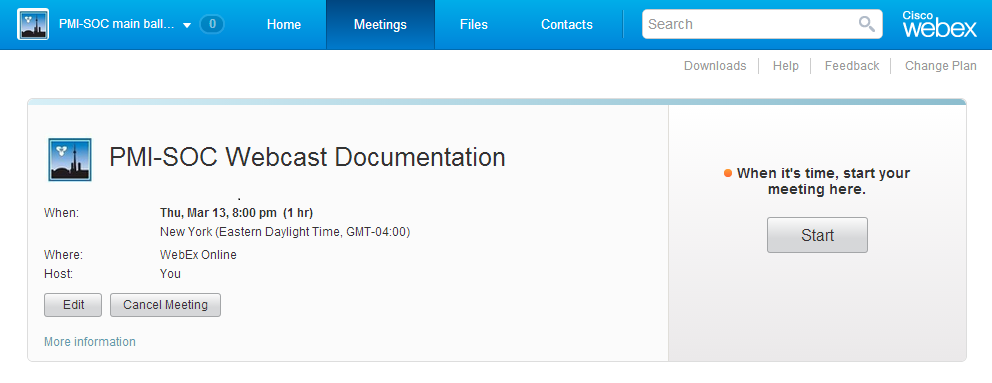
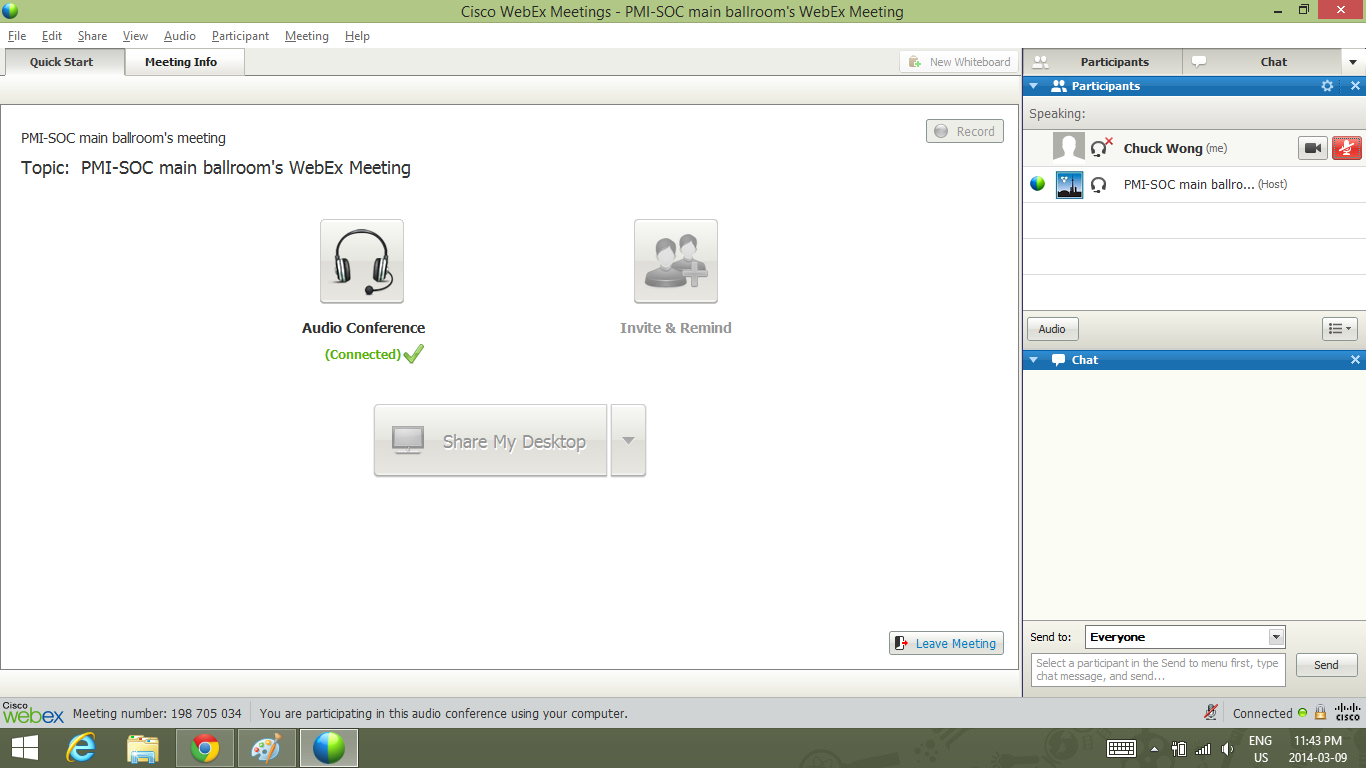
The meeting will begin
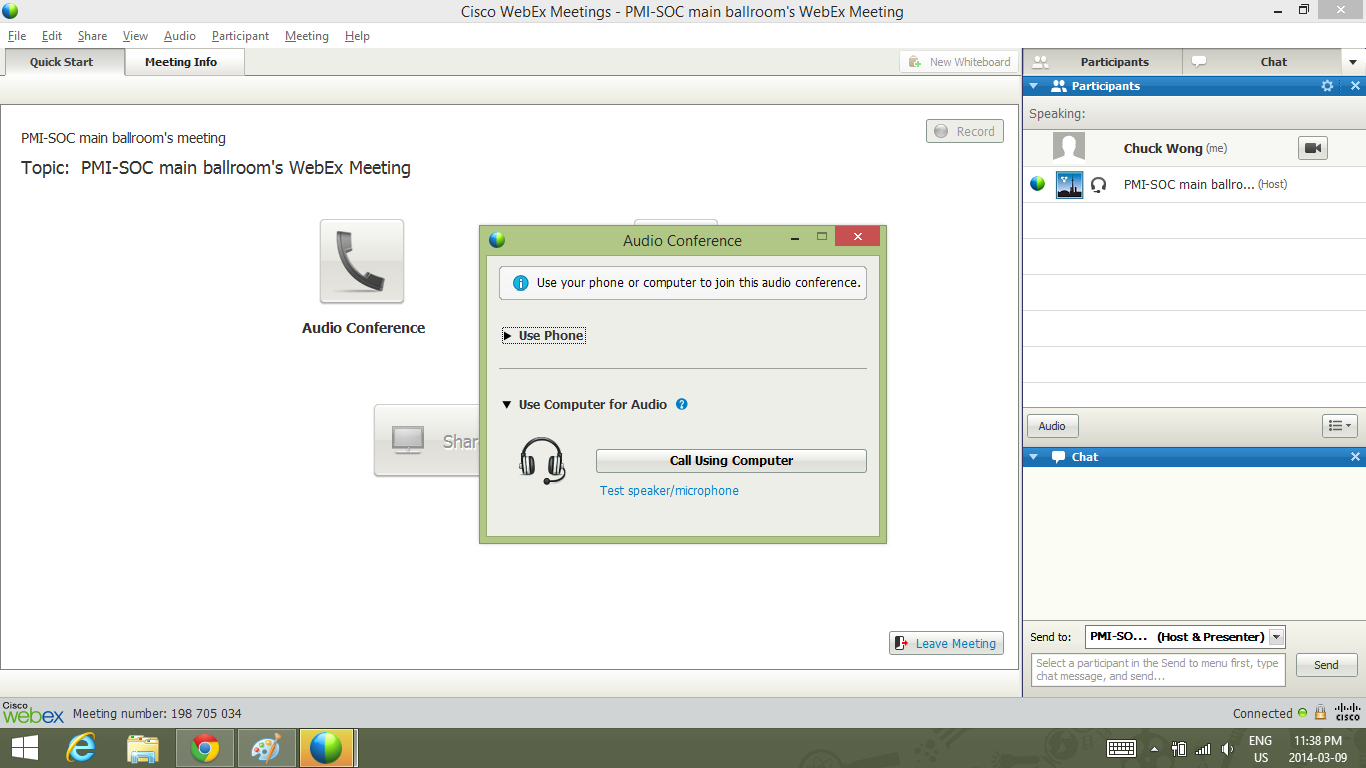
- Click “Call Using Computer” in Audio Conference box
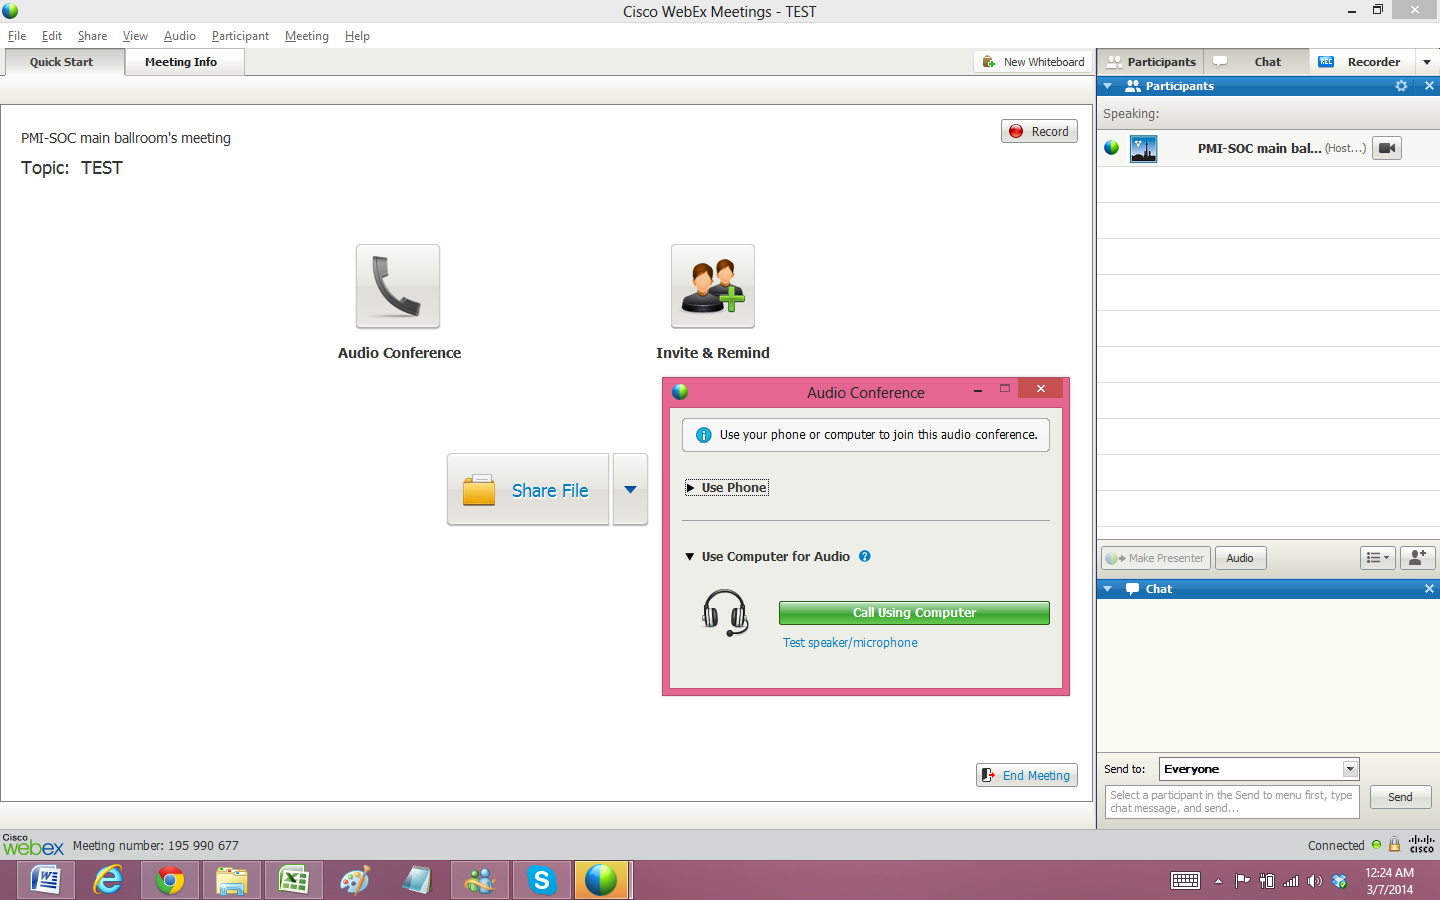
- Click Speaker “Test” button in Speaker/Microphone Audio Test box
- Click Microphone “Test” button in Speaker/Microphone Audio Test box
NOTE: the mic being tested is the laptop’s built in mic & NOT the lapel mic

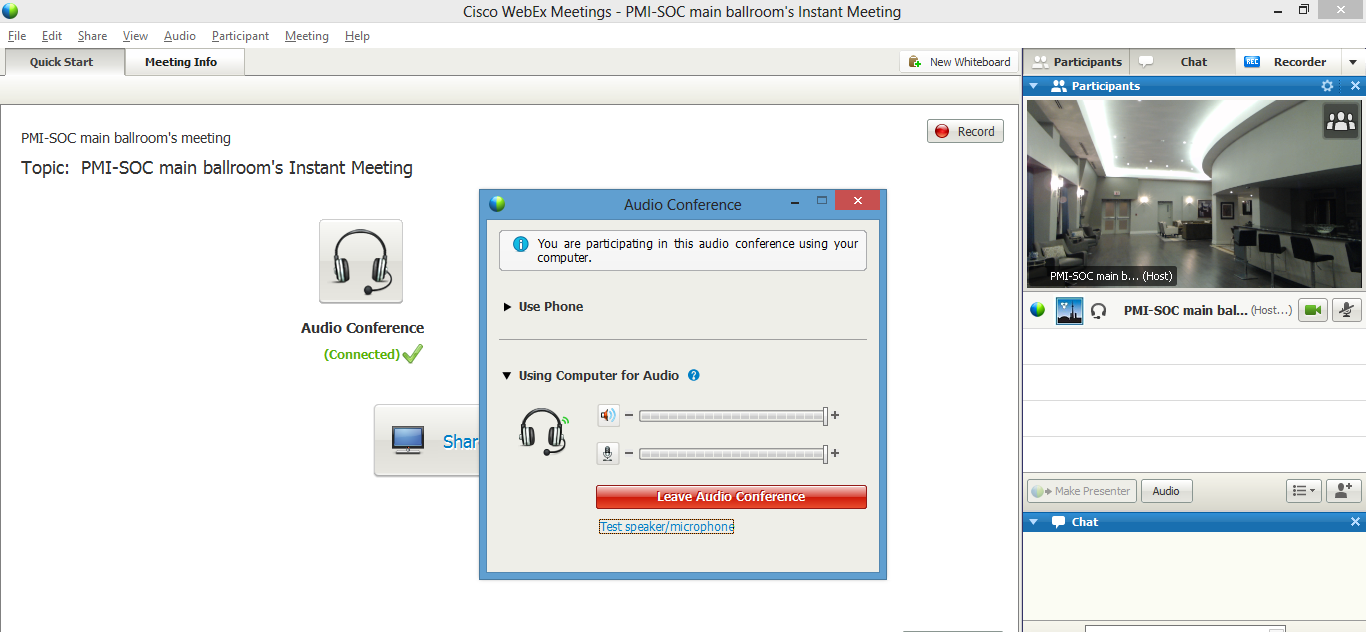
Audio conference is now connected
- Click “Video Camera” button to turn on the share video function
![]()
- Hit the Mute button on the camera base (red light should turn on)
- Adjust the zoom with the remote (or on the base) to best fit the speaker in the video view
- Click “Audio” button to bring up the Audio Conference box
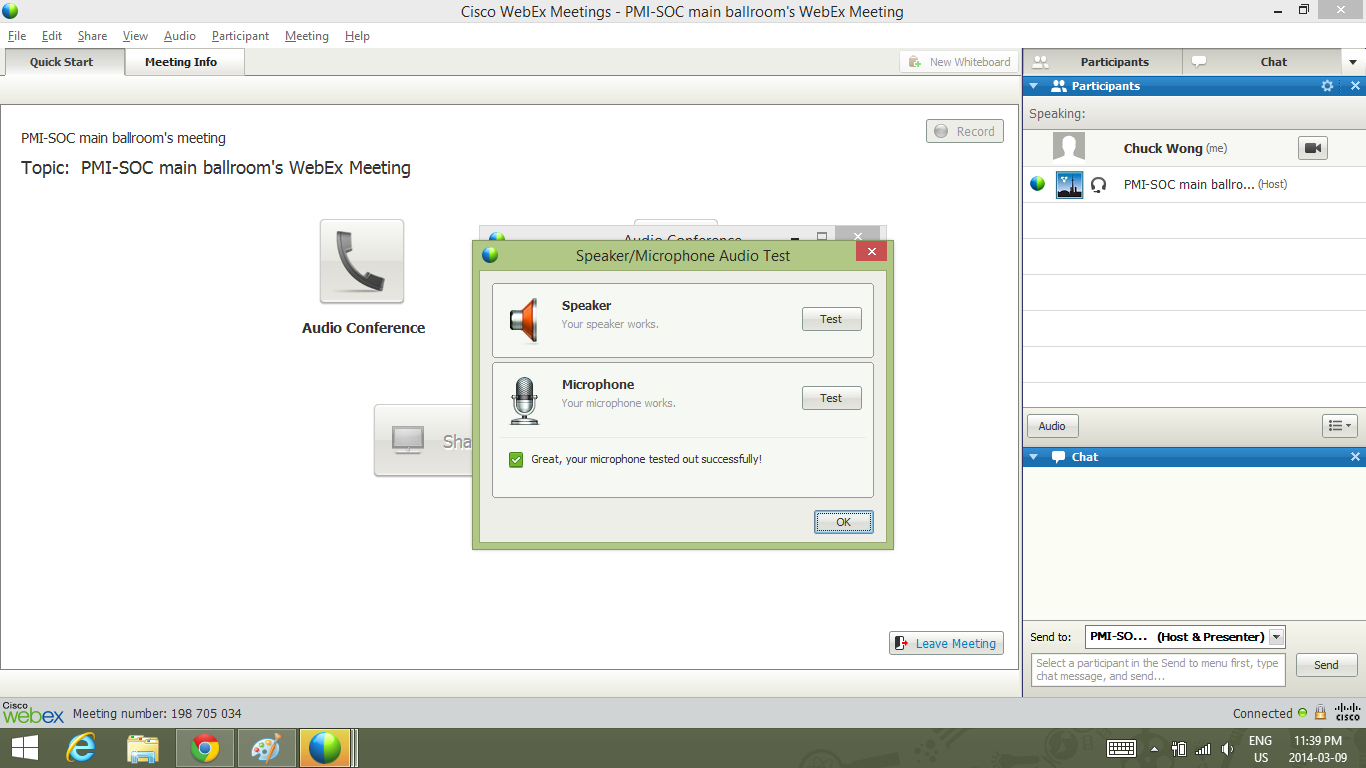
- Click “Test speaker/microphone” button in Audio Conference box
The Speaker/Microphone Audio Test box will pop up
The microphone is currently set to “Internal Mic” which is the laptop’s mic
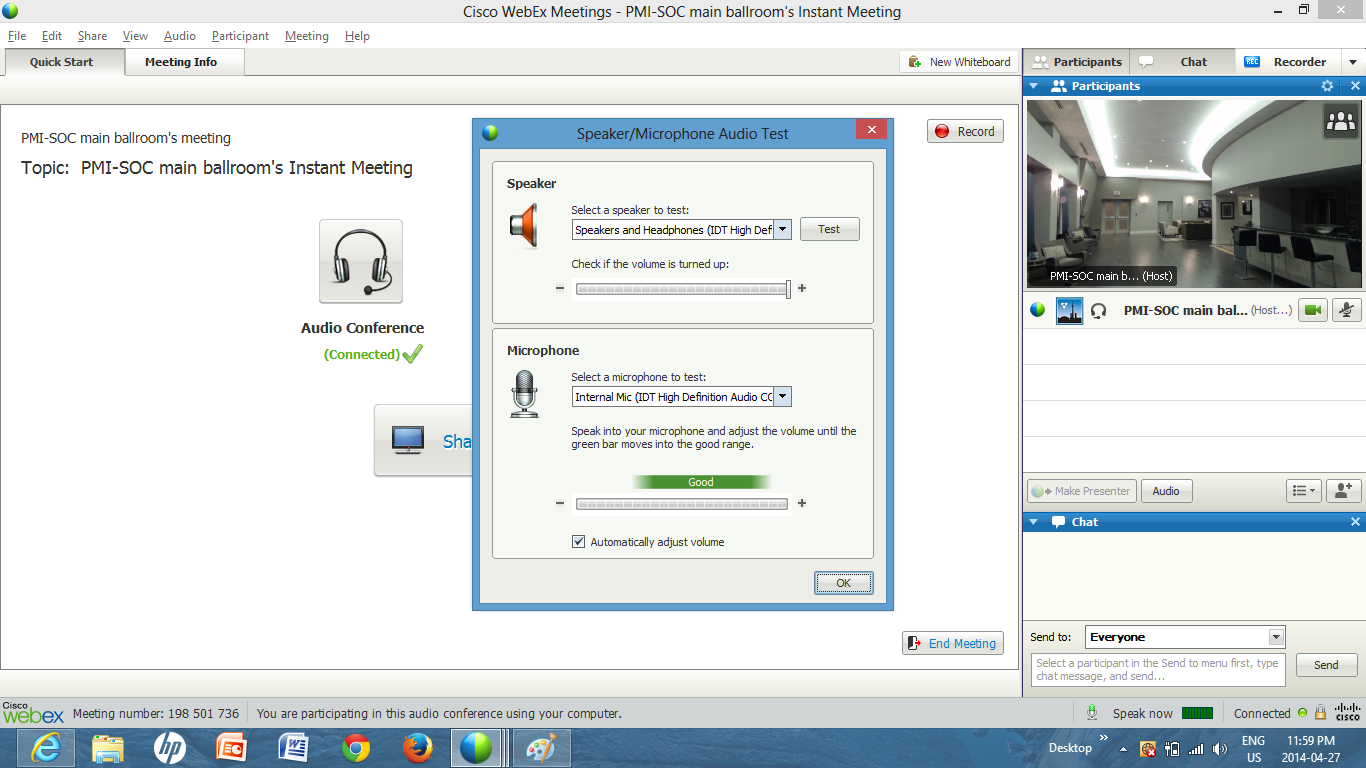
- Click the Microphone’s dropdown menu arrow & select “Headset Mic” then click “OK” button
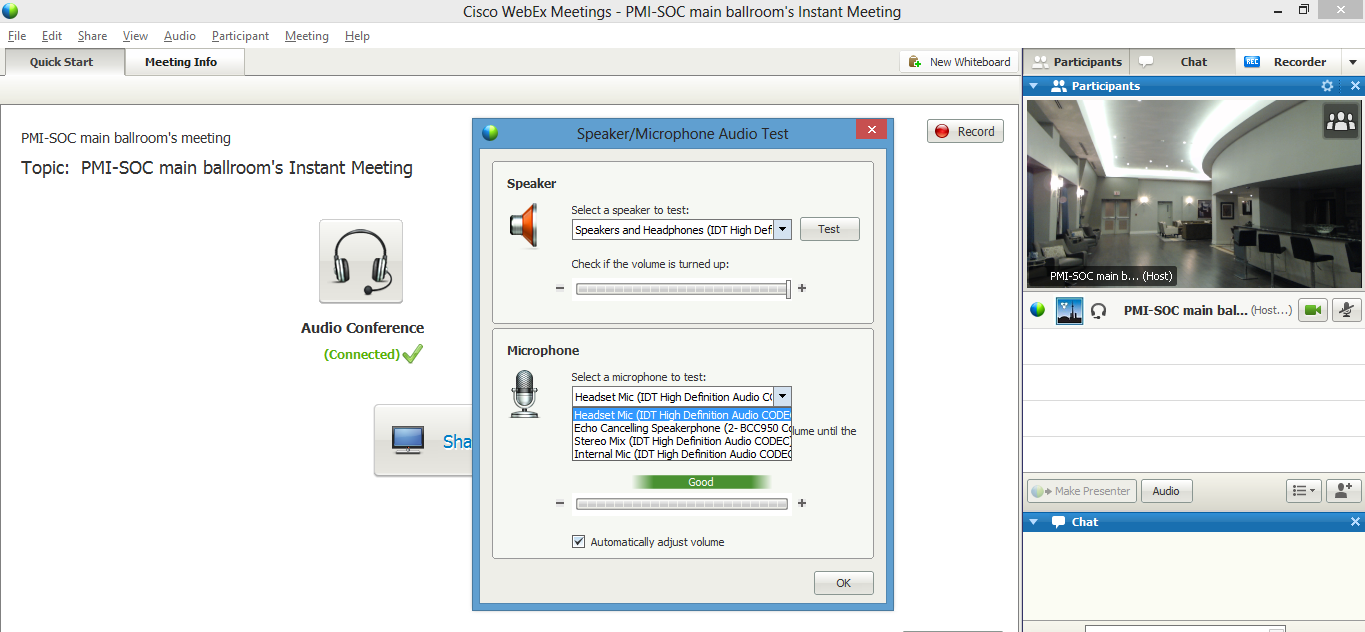
- Since the lapel mic transmitter is on speak into it to test and make sure the system is picking it up
- Ensure the laptop mic is not being picked up by turning off the lapel mic transmitter & speaking into the laptop
- Turn lapel mic transmitter back on & do a final test – make sure it’s working properly
At this point the Web Chat monitor should log into the WebEx meeting (see section 2.8)
Log Into WebEx Meeting – By Web Chat Monitor PC
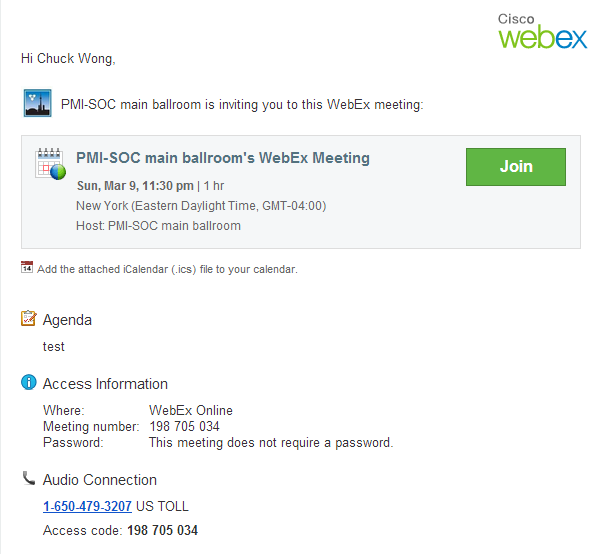
When the email went out to participants, the organizer should have included the Web Chat monitor in the email invite.
- Open your email and click “Join” button
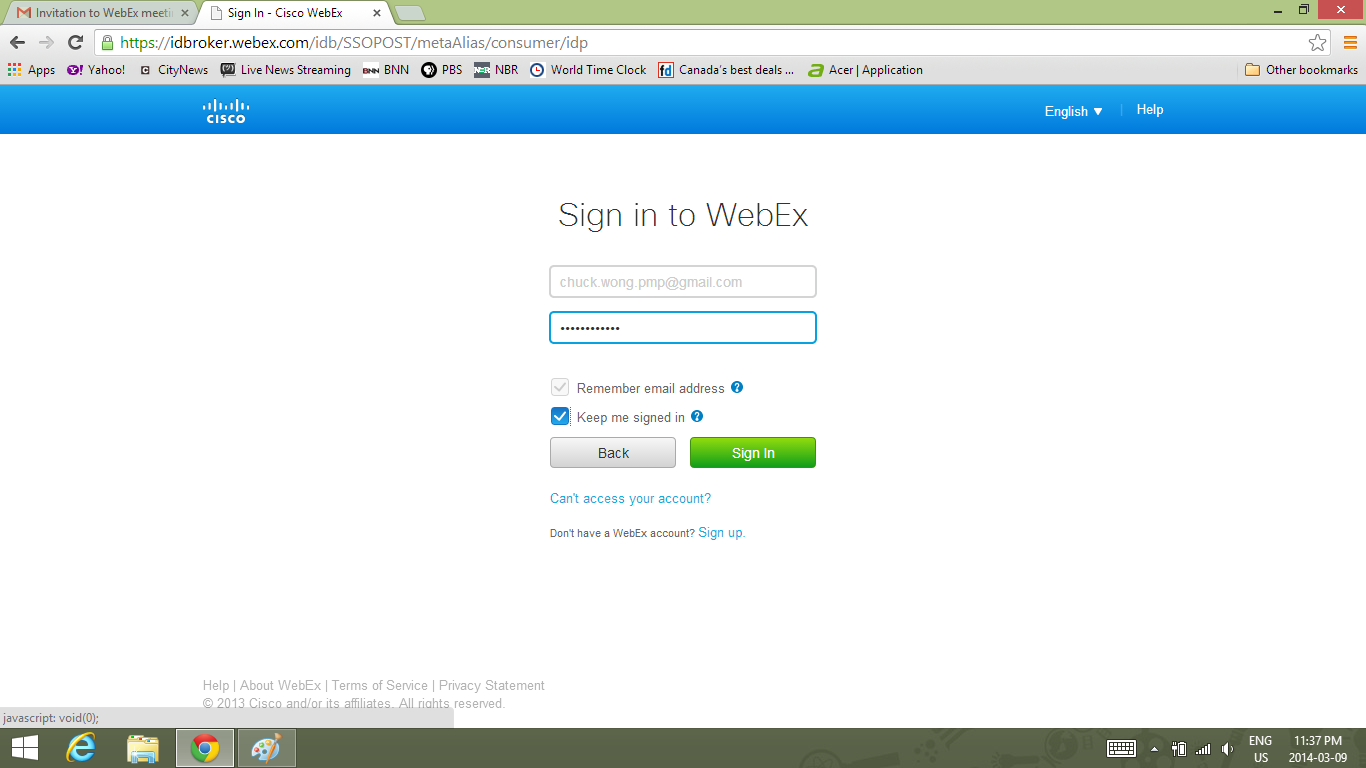
- Log into WebEx
- Check the checkbox “Remember email address” & “Keep me signed in”
- Click “Sign in” button
If you didn’t get the invite, you can log into WebEx using your own account (assumption is you have a personal WebEx account)
- Click the “Join by Number” button
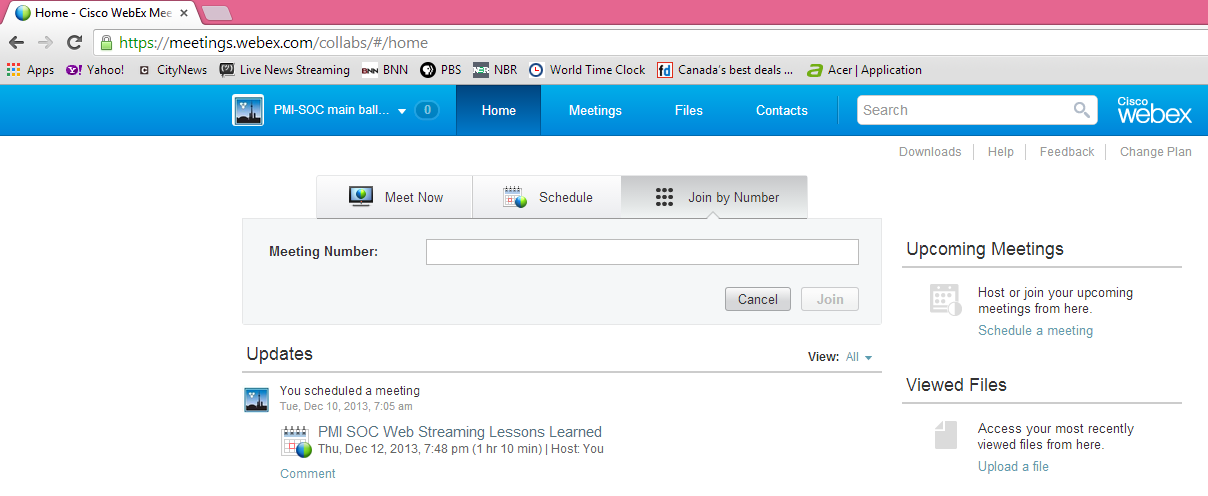
- Enter meeting number (ask organizer for it)
- Click “Join” button
- After WebEx launches
- Click “Call Using Computer” button (Note: the Audio Connection’s toll free number is a US number. Canadian audience will pay long distance. Our account does not have a Canadian toll free number)
- Plug headphone/mic headset into the computer & put it on
- Click Speaker “Test” button – make sure it’s working properly
- Click Microphone “Test” button – make sure it’s working properly
- Ask host PC team member to speak into the lapel mic to confirm sound is coming through
- After confirmation audio is working, KEEP lapel mic transmitter on
- Adjust the audio receiver’s audio level adjustment knobs to ZERO
Always keep audio receiver to ZERO until the speaker goes on
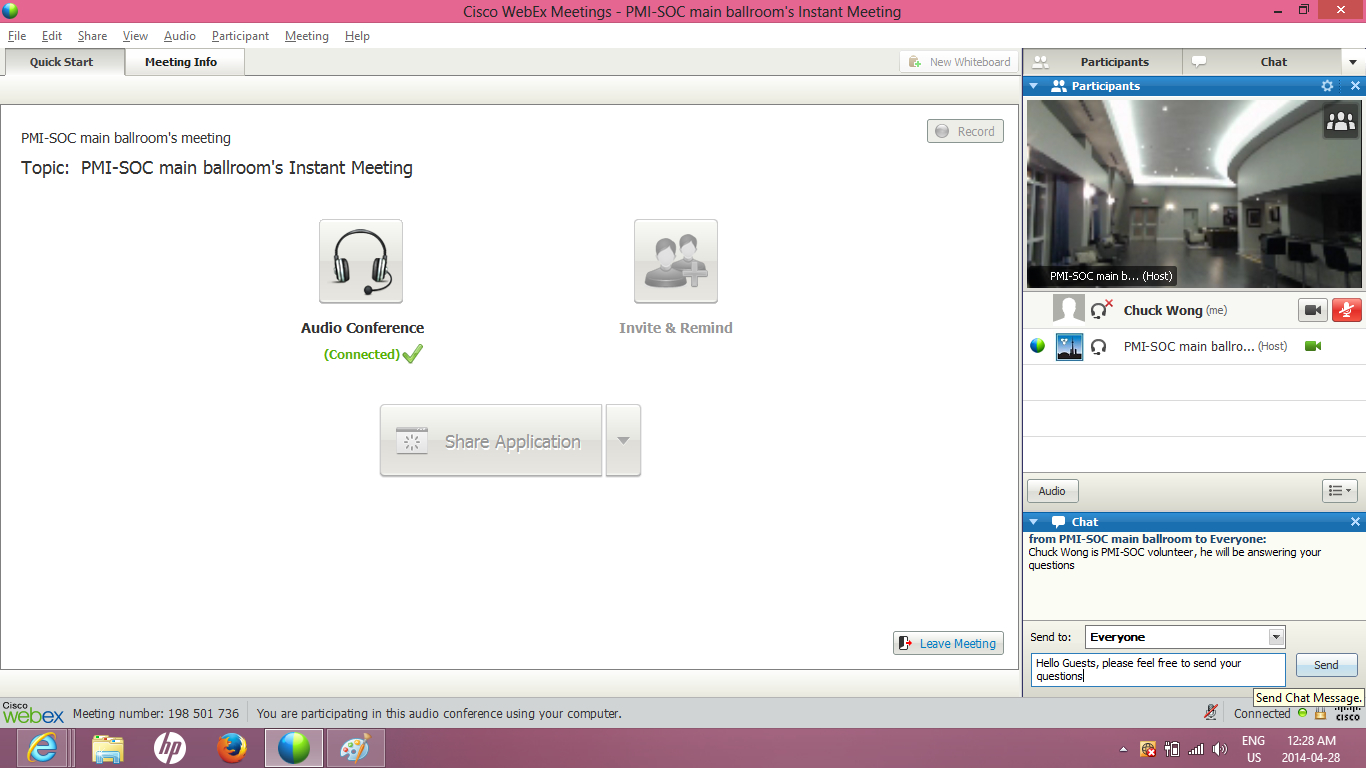
WebEx Meeting Chat Introductions
HOST PC: After your web chat monitor join the meeting
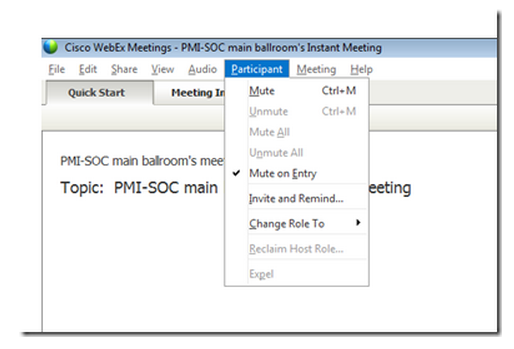
- Set “Mute on Entry” in order to mute all participants by clicking “Participant” in the menu bar, then “Mute on Entry”
- In the Chat box, change Send to: “Everyone”
- In the Chat box, introduce your web chat monitor as a PMI-SOC volunteer.
Example: “Chuck Wong is PMI-SOC volunteer; he will be answering your questions.”

WEB CHAT MONITOR: After the host has introduced you.
- In the Chat box, change Send to: “Everyone”
- Send a message to everyone: “Hello Guests, please feel free to send your questions”
Setup Lapel Mic Transmitter On Speaker
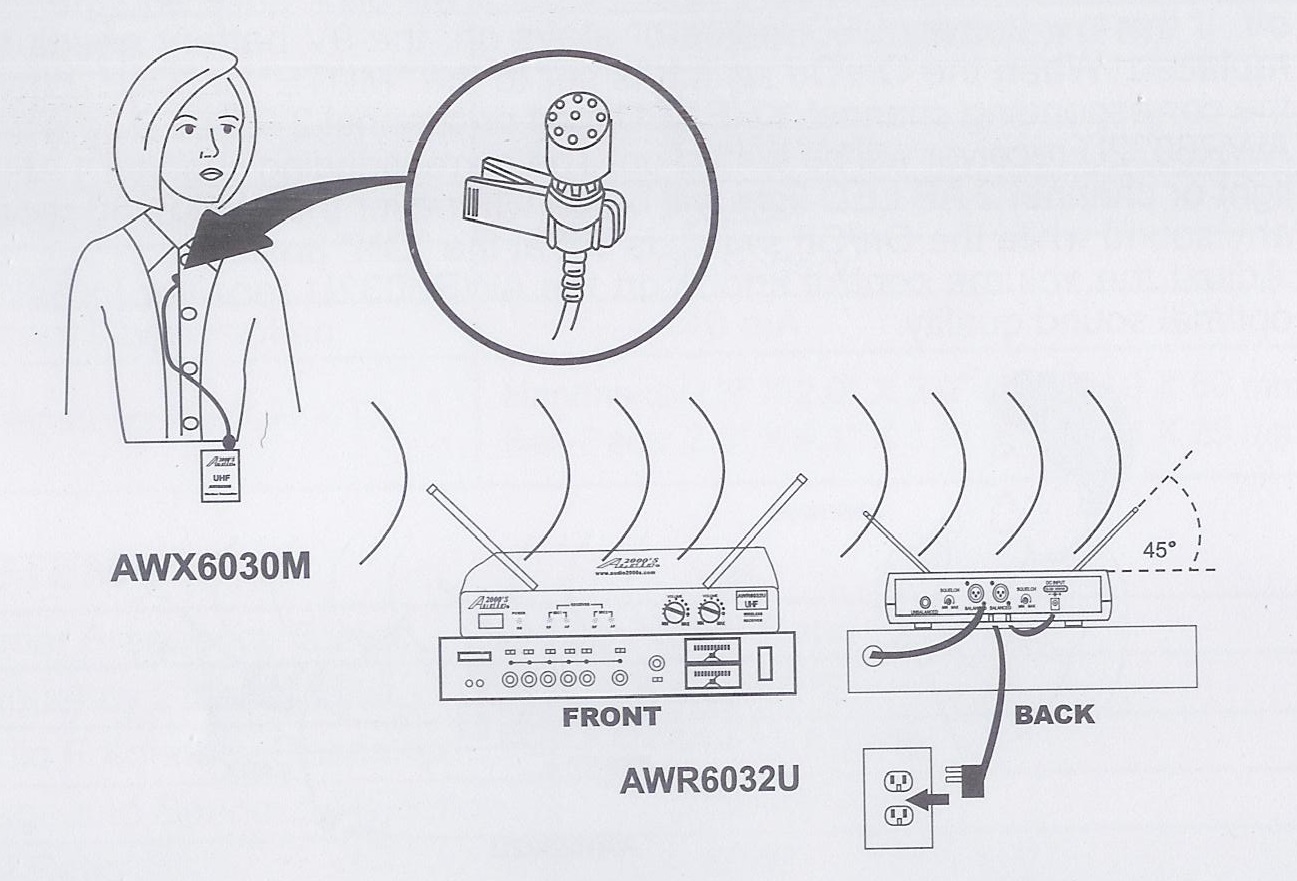
- Adjust the audio receiver’s antennas to 45⁰
- Give the lapel mic & belt-pack transmitter to the speaker. Instruct speaker to clip the lapel mic onto shirt or jacket as in picture above
- Adjust the audio receiver’s audio level adjustment knobs to 75% when the speaker is ready
When the speaker has finished
- Adjust the audio receiver’s audio level adjustment knobs back to ZERO
- Grab the lapel mic & belt-pack transmitter back from to the speaker. Do NOT switch OFF, keep on for the next speakers.
Only adjust the audio receiver’s audio level adjustment knobs instead of messing with the lapel mic & belt-pack transmitter
Event With Only 1 Speaker & 1 Presentation
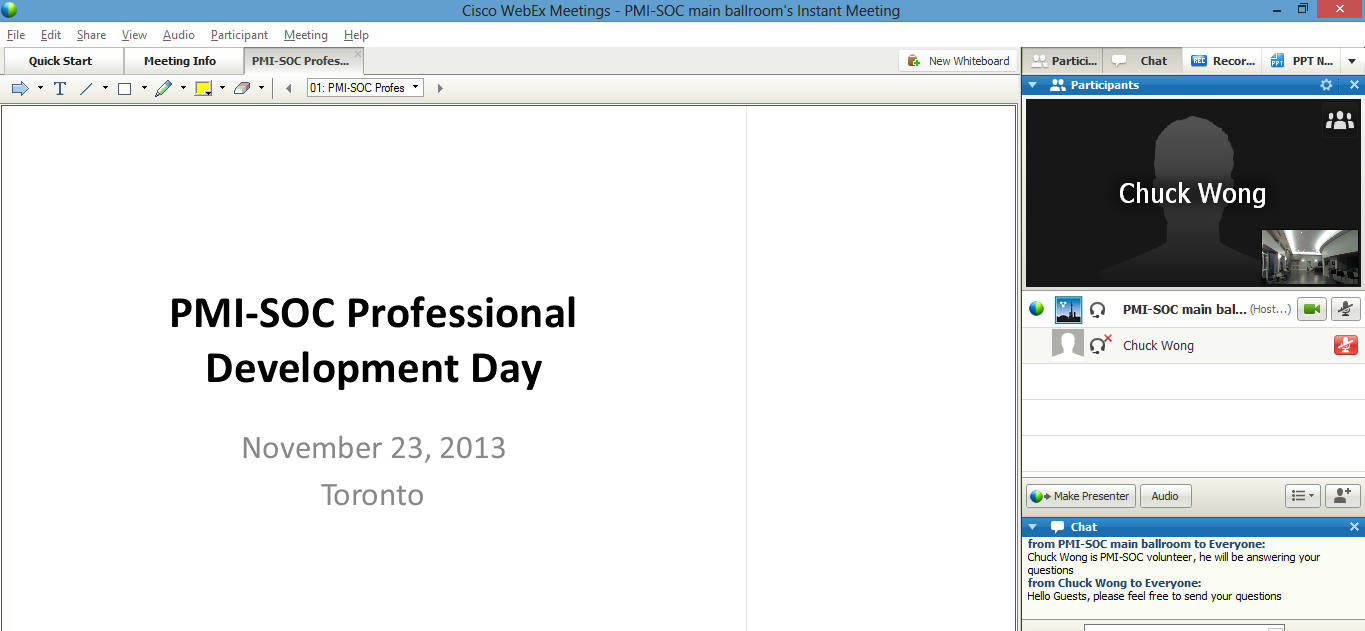
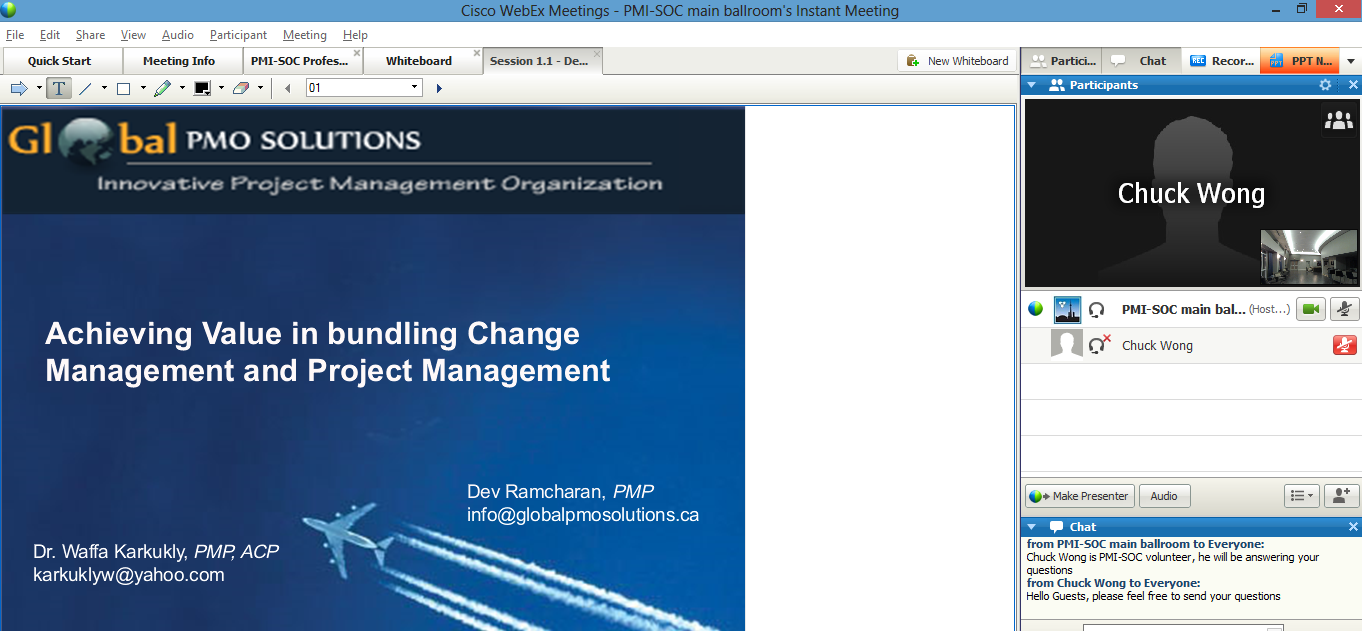
- Prepare a Whiteboard before start of event that will show the Event Name to the participants by clicking the “New Whiteboard” button and typing text in or you can prepare a PowerPoint slide with the same information and share it (see below example)
Example of Event Title page
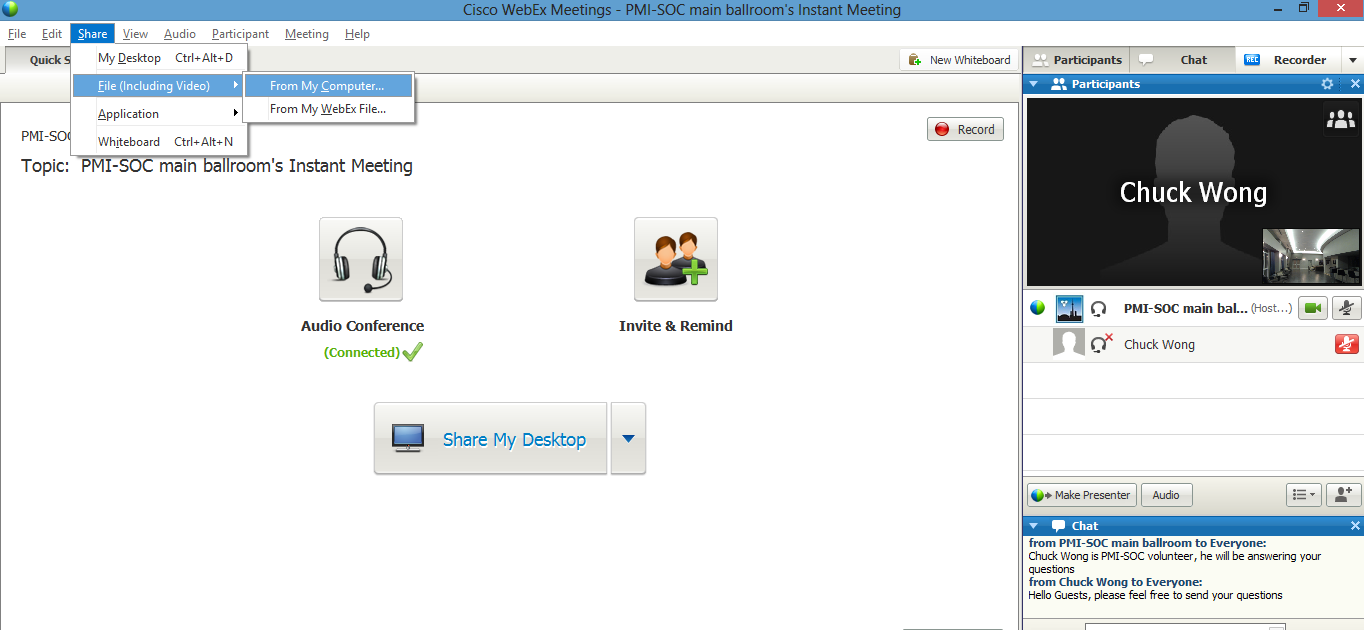
Make sure you have the presenter’s PowerPoint presentation on your computer, in its own folder
- Click “Share” on top menu
- Point cursor to Share File (including video) then click “From My Computer”
- Locate the PowerPoint presentation of the current speaker & double click the file. The presentation will load but the Whiteboard (or Event Name slide) is still showing to the participants
- Give the lapel mic & belt-pack transmitter to the speaker. Instruct speaker to clip the lapel mic onto shirt or jacket as in picture above (see page 22)
- Adjust the audio receiver’s audio level adjustment knobs to 75% when the speaker is ready
- Click the presentation tab when the speaker is ready to present
- The microphone icon should be RED next to attendee’s name because on page 20 above the “Mute on Entry” was turned on. If not, go click “Participant” in the menu bar, then “Mute on Entry”.
- Follow the speakers presentation by forwarding the corresponding slides
When the speaker has finished
- Adjust the audio receiver’s audio level adjustment knobs back to ZERO
- Grab the lapel mic & belt-pack transmitter back from to the speaker
- Proceed to 2.13 Event Wrap Up (see page 27)
Event With Multiple Speakers & Presentations
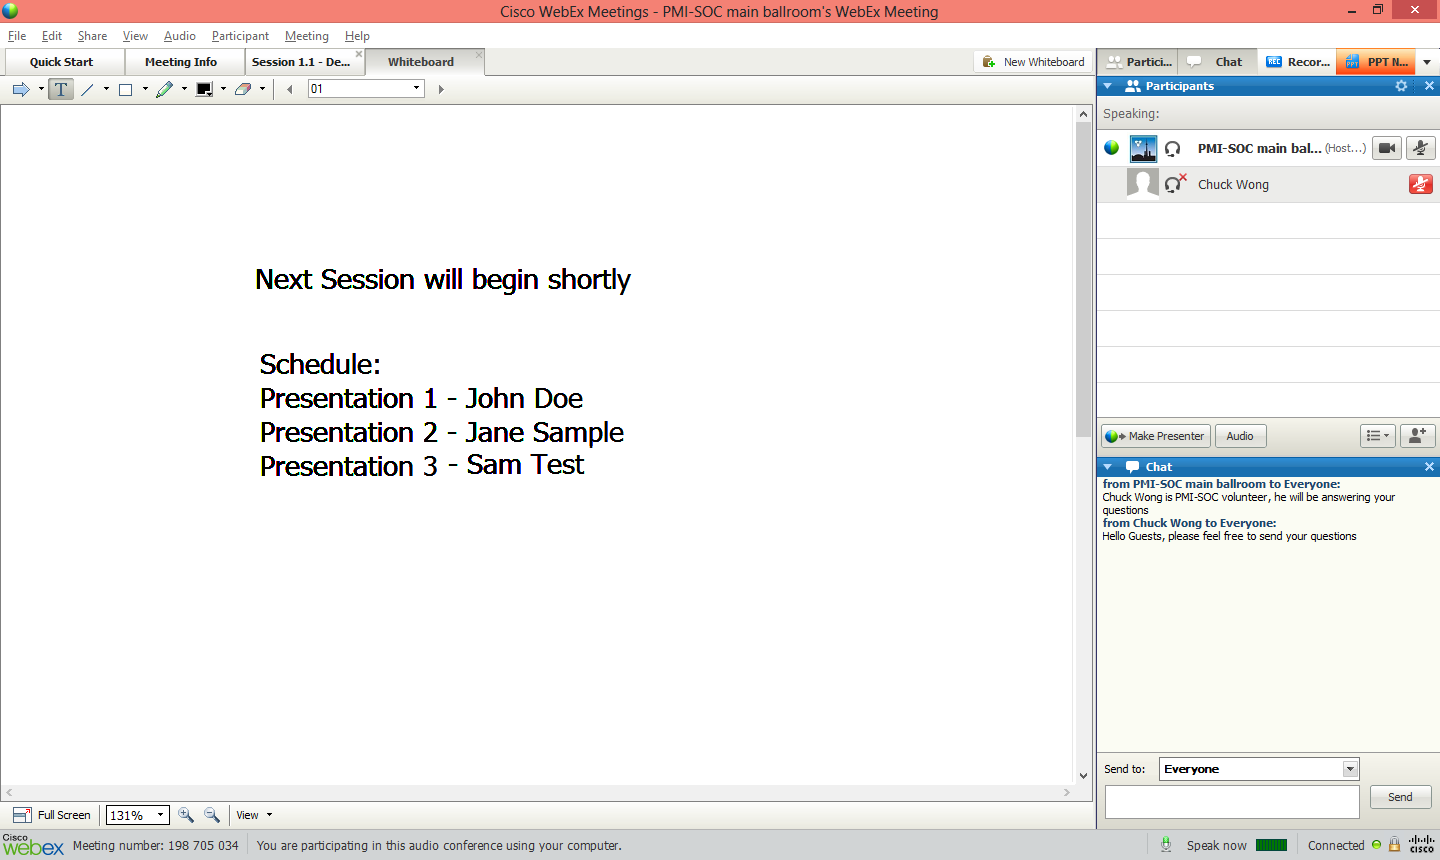
If the event has multiple speakers and presentations you will require a “break” screen to be put up in between the speakers.
- Prepare a Whiteboard before start of event that will show the agenda to the participants by clicking the “New Whiteboard” button and typing the agenda (see below example)
- After a speaker finishes, switch from their presentation to the Whiteboard
- Load the next speaker’s presentation by clicking “Share” on the menu bar, then click “File (Including Video)”, then click “From My Computer”, then locate the file. Presentation will load but the Whiteboard is still showing to the participants
- Give the lapel mic & belt-pack transmitter to the speaker. Instruct speaker to clip the lapel mic onto shirt or jacket as in picture above (see page 22)
- Adjust the audio receiver’s audio level adjustment knobs to 75% when the speaker is ready
- Click the presentation tab when the speaker is ready to present
- Follow the speakers presentation by forwarding the corresponding slides
When the speaker has finished
- Adjust the audio receiver’s audio level adjustment knobs back to ZERO
Always keep audio receiver to ZERO until the speaker goes on
- Grab the lapel mic & belt-pack transmitter back from to the speaker. Do NOT switch OFF, keep on for the next speakers.
- Repeat this process for the next speaker
- Proceed to 2.13 Event Wrap-Up (see page 27)
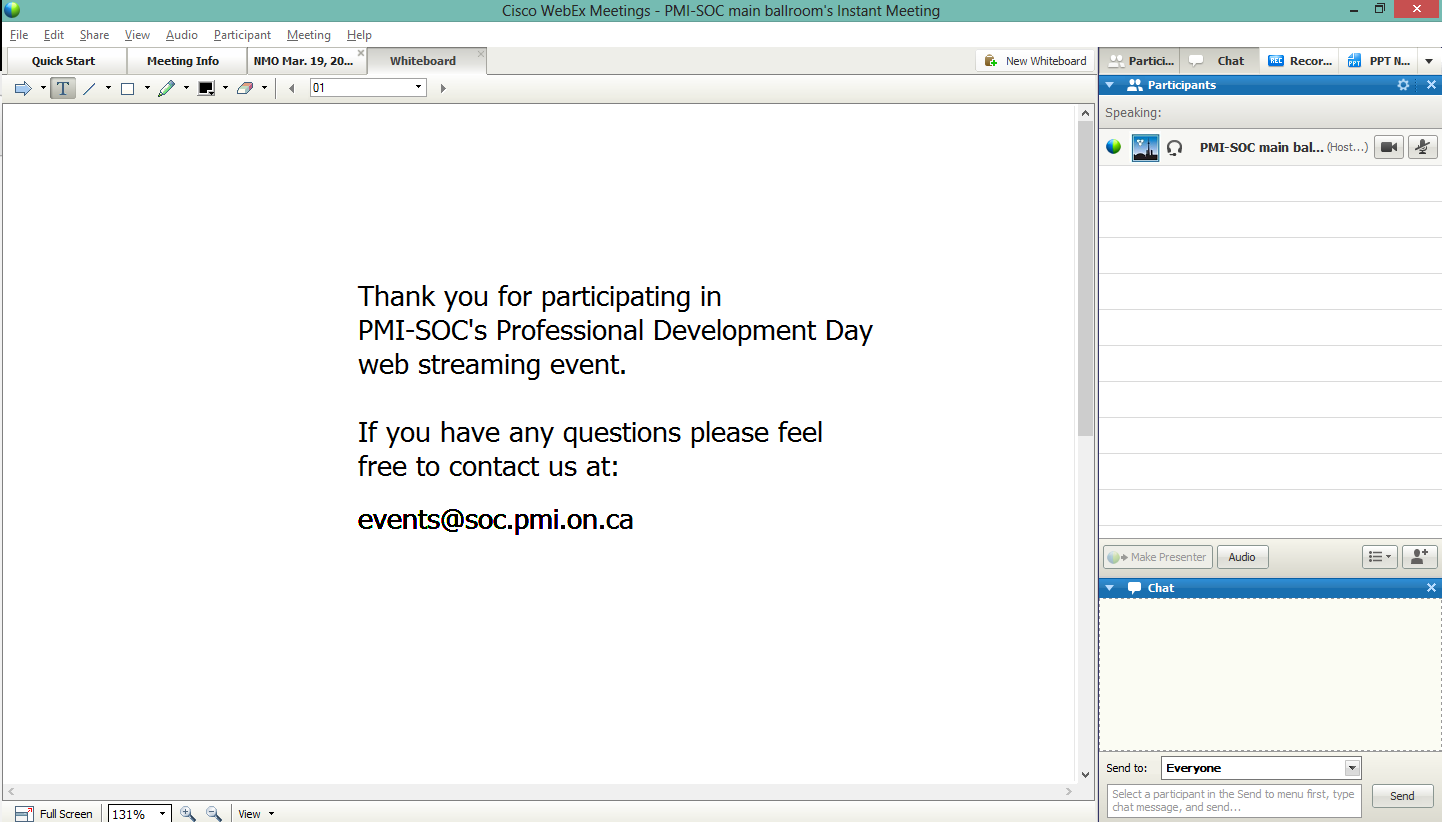
Event Wrap-Up
HOST PC: After your speaker or final speaker has finished presenting
- Prepare a Whiteboard before start of event that will thank the participants for joining by clicking the “New Whiteboard” button and typing the message (see below example)
WEB CHAT MONITOR:
- In chatbox thank everyone for participating in the web streaming event
Packing-up
- End WebEx meeting, power down laptops and audio equipment, pack-up equipment by checking off equipment listed on page 6
Equipment Setup For Two Rooms (Keynote & A Breakout Room)
Setting Up Rooms
There will be 2 teams of 3, fist team is the Keynote Team and the second team is the Breakout Team.
Keynote Team:
Perform steps 2.1 to 2.8 (see page 5 to 21).
Breakout Team:
Perform steps 2.1 to 2.8 (see page 5 to 21).
WebEx Meeting Chat Introductions
Keynote Host PC: After your web chat monitor and Breakout Team join the meeting
- The microphone icon should be RED next to attendee’s name because on page 20 above the “Mute on Entry” was turned on. If not, go click “Participant” in the menu bar, then “Mute on Entry”.
- In the Chat box, change Send to: “Everyone”
- In the Chat box, introduce your web chat monitor as a PMI-SOC volunteer.
Example: “Chuck Wong is PMI-SOC volunteer; he will be answering your questions in the Keynote Room.”
- In the Chat box, introduce the Breakout Host PC.
Example: “Breakout room Host is PMI-SOC volunteer streaming from the Breakout Room.”
- In the Chat box, introduce the Breakout web chat monitor.
Example: “Samantha Sample is PMI-SOC volunteer; she will be answering your questions in the Breakout Room.”
Keynote Web Chat Monitor: After the Keynote Host has introduced you.
- In the Chat box, change Send to: “Everyone”
- Send a message to everyone: “Hello Guests, please feel free to send me your Keynote Room questions”

Breakout Web Chat Monitor: After the Keynote Host has introduced you.
- In the Chat box, change Send to: “Everyone”
- Send a message to everyone: “Hello Guests, please feel free to send me your Breakout Room questions”
Switching Between Rooms
When the Keynote speaker is ready to present.
Keynote Team:
Perform sections 2.10 to 2.12 (see page 22 to 26).
When speaker finishes, do not perform last step (“Proceed to 2.13 Event Wrap-Up”) in section 2.12
Keynote Web Chat Monitor:
- In the Chat box, change Send to: “Breakout room host”
- Send a warning message: “Keynote room speaker has just finished, are you ready to begin hosting? I will give you hosting privileges in 1 minute”
- In the Chat box, change Send to: “Samantha Sample” (Breakout web chat monitor)
- Send a warning message: “Keynote room speaker has just finished, I will give hosting privileges to “Breakout room host” in 1 minute”

Keynote Host PC:
- Pass presenter privileges by clicking the “Breakout room host”, then click the “Make Presenter” button
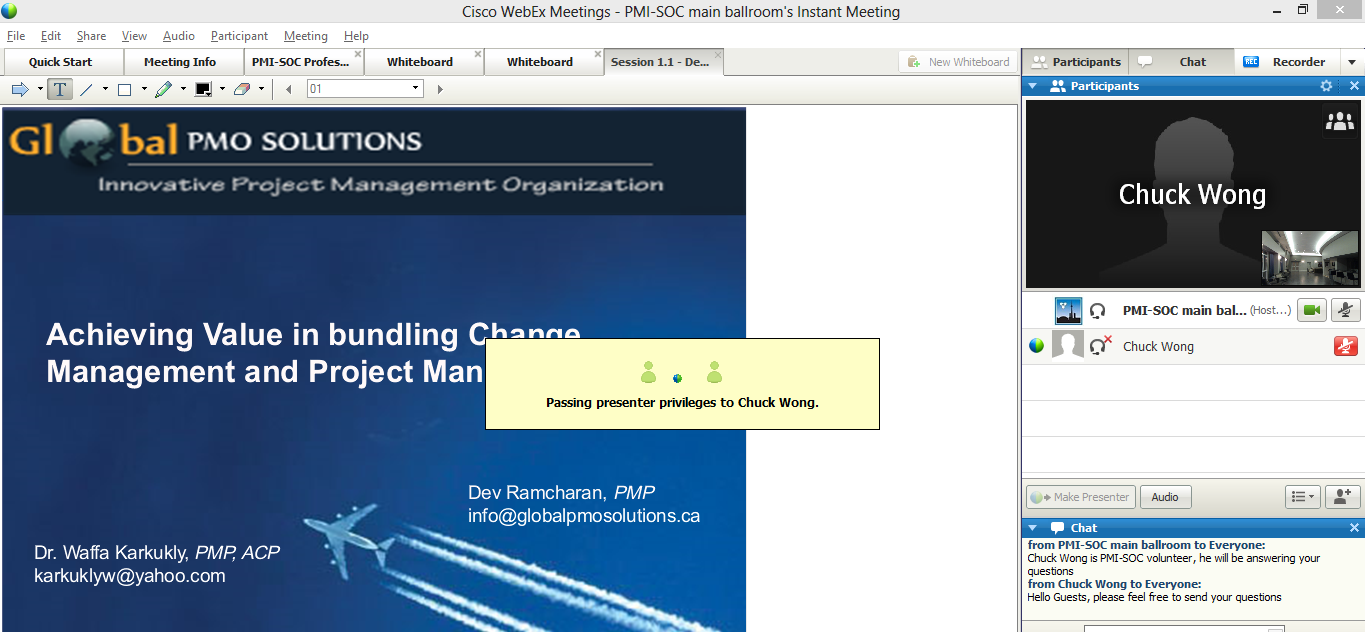
Breakout room host
Breakout Room Team:
Perform sections 2.10 to 2.12 (see page 22 to 26).
When speaker finishes, do not perform last step (“Proceed to 2.13 Event Wrap-Up”) in section 2.12
Breakout Web Chat Monitor:
- In the Chat box, change Send to: “PMI-SOC main ballroom” (Keynote host PC)”
- Send a warning message: “Breakout room speaker has just finished, are you ready to begin hosting? I will give you hosting privileges in 1 minute”
- In the Chat box, change Send to: “Chuck Wong” (Keynote web chat monitor)
- Send a warning message: “Breakout room speaker has just finished, I will give hosting privileges to “PMI-SOC main ballroom” in 1 minute”
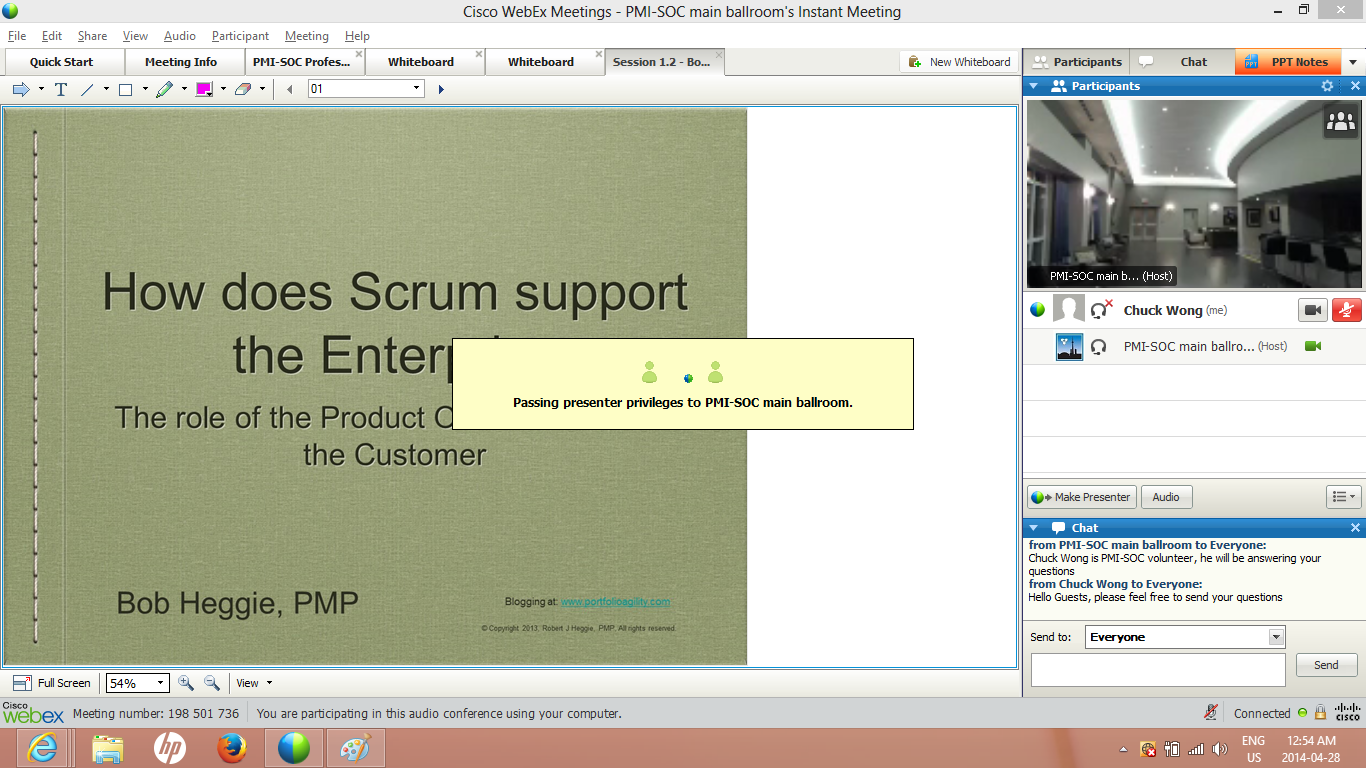
Breakout Host PC:
- Pass presenter privileges by clicking the “PMI_SOC main ballroom”, then click the “Make Presenter” button
REPEAT ENTIRE 3.3 SECTION AS NEEDED
When the final speaker has finished, proceed to section 2.13 “Event Wrap-Up”
Web Streaming Team Setup Guide
END